Saturday, May 16, 2015

Converse Nails

Hey beauties,

I have been wanting to try converse nails for awhile now and since I chopped my nails off I figured why not try them now.So there are tons of converse nail art pictures on the interwebs but I wanted to do something a bit different.


I started this design out with a gradient that I sponged on with a damp makeup sponge. Then I used a small dotting tool white polish, a black nail art pen and a white striping polish.
And that is it if you all would like picture tutorials then please let me know.

Bye for now,
Stephanie

It's been a long time

Hey beauties, I know it has been a super long time since I have made a blog post and tbh I don't have a good reason. I mean life just takes over and with 3 kids an trying to get custody of my husbands nephew things just slip.

I am gong to start blogging again. Posting my manicures and maybe try swatching polishes when I get new ones. I will post my newest mani tight after this post. That is all for now.

See you soon,
Stephanie

Sunday, September 21, 2014

Neon Galaxy

Hey all so its a new day and a new manicure I hope you all enjoy this one because I know I do.


So I started this manicure with a white base to  make the neon colors pop better. I used Daredevil by Sinful colors over all my nails but my ring finger on that finger I used Nina ultra pro in Solar flare. Once dry I used a make sponge and dabbed on some white in random places on my nail. Then on the pink nails I used the neon yellow and sponged it over the white and a little bit on the pink to get an orange color. Then on the yellow I did the same thing using the pink.

After sponging and blending I topped with Orly shine on crazy diamond. Then using a white stripper I added some dots and star shapes and then topped them all off with a qdtc (quick dry top coat). I cleaned up and that's it all done. 

I wanted this to be super easy so I only used 3 colors the glitter is optional and so are the white dots and star shapes. I really like how this turned out and I can't wait to try out Pastel galaxy nails. let me know what you all think in the comments below and if you try then out I would like to see them.

Ttyl,
Stephanie

Wednesday, September 17, 2014

Braided Nail

Hey all I know it has been about a month and a half since I posted but...you know life happens and I started a food blog and I also started knitting again which lead me to open an online store. So you know I've been super busy :-)

Anyway I am going to do my best to post more once or twice a week. But I am back with this super cute and easy manicure.

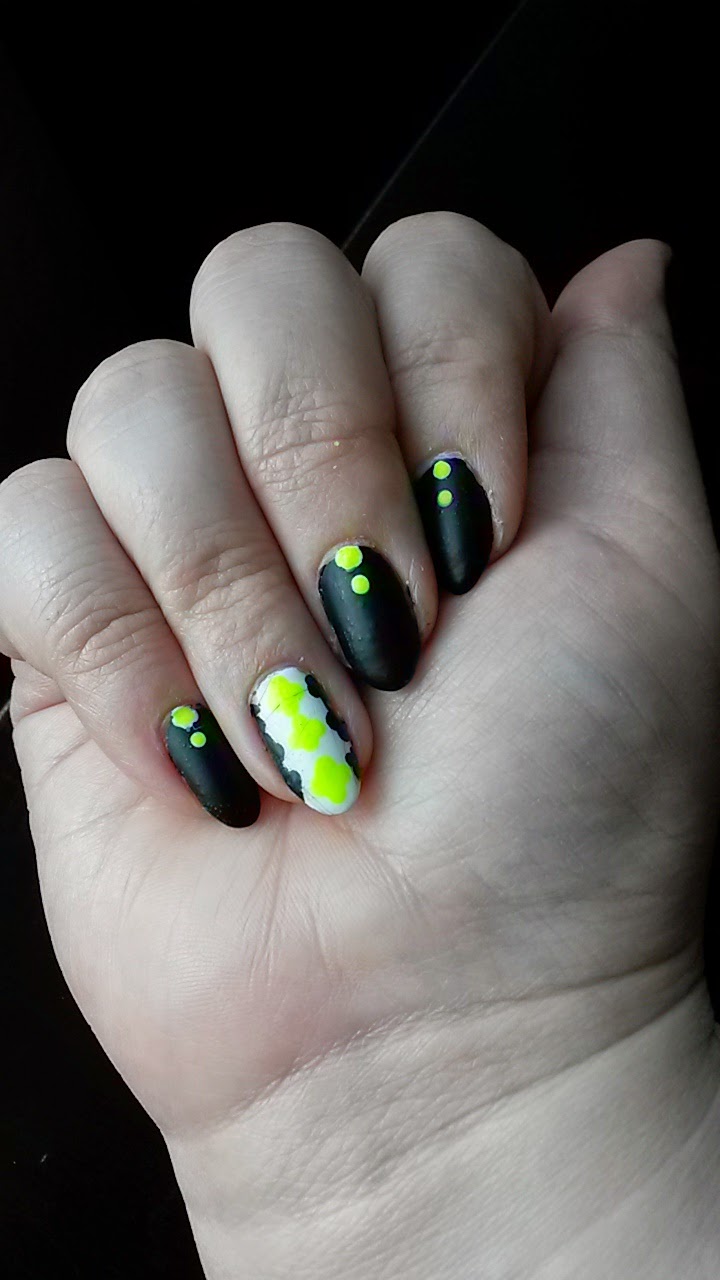
I used Wetnwild megalast polishes in I need and refresh Mint, On a trip and Wet cement. The only tool I used was a large dotting tool and the polish brush it self. Now if you don't have a dotting tool don't fret you can use a bobby pin, an old dried up ink pin, a pencil eraser or even the end of a makeup brush.


On my ring finger I started out with a coat of On a trip, then on a slight angle I added I need a Refresh Mint, on the other side under that I added a strip of Wet Cement and so on intil I ran out of nail. I let that dry as I painted the rest on my nails with two coats of Wet cement. Then using my large dotting tool I placed a big dot and little dot at the base of my nail. Once they were all slightly dry I added a layer of top coat ,cleaned up the sides and thats it.


I really love this manicure it tured out really nice and I hope you all like it too. Ttyl,

Stephanie

Thursday, July 3, 2014

Random shapes

So as no surprise I've been gone for a little while and well I'm back with this fun little manicure.

I wanted to do something with these really nice holographic nail polishes that I got and I really wasn't impressed with a lot of things that I saw.... Well to be honest I was impressed but they were already done and my husband kind of challenge me to do something that I hadn't really seen yet. So this is what I came up with I put the design black base cuz I just figured that it would really cool that way and it really does, unfortunately the pictures that I have don't know off the design that great but they still look pretty awesome in my opinion.


What I used:
Literary Lacquers:
A straw
Star stickers and the sticker outline
A cut up makeup wedge
A small dotting tool

I started with the black base completely dry which is why I use a fast drying black nail polish. Once the black polish was dry I put the sticker on a random spot on my nail and sponged one of the holographic polishes over it and quickly removed the sticker. As for the straw I just dipped it into a puddle of nail polish and then press it on my nail. As for the dots well those just kind of speak for themselves ;-)
Once done I topped with two layers of a fast drying top coat and that was it. I really like how it turned out and I hope you guys enjoy them too if you would like to see how I get them I can easily do a video or do a picture tutorial for you just let me know in the comments down below.

Well that's all for now until next time.
xoxo Stephanie

Sunday, June 15, 2014

Neon Quatrefoil Nails

Neon quatrefoil nails...... I mean hello that is just awesome so I had to do it.

Quatrefoil nails are really popular right now and its summer so neons are also popular right now so I just put them together.


What I used:

Black polish
White polish
Neon yellow polish
Matte top coat
Dotting tools

I started off with my base colors white on my ring finger and black on all the rest. Once my base colors were dry I started the quatrefoil design with my neon yellow 4 dots in a plus pattern, on the side of the nail I did 3 dots of black to offset the neon. Then on the other fingers I used the white for a base so the yellow would pop.


This is the simple version of the quatrefoil design. The advanced one has an outline and little lines coming out of the open corners. If you would like me to try my hand at the design then please let me know.

So what do you all think about the quatrefoil design? Do you like it? Will you try it out? Let me know down below


Ttyl,
xoxo Stephanie

Tuesday, June 10, 2014

Jelly Sandwich manicure

I have seen all kinds of jelly sandwich manicures, mostly with glitter and designs but none using crackle nail polish. So that's what I wanted to do.


I started with an opaque color ,then using a sliver crackle I  made a diagonal line. Once dry I added one coat of my sheer or jelly polish and waited for that to dry. As soon as it was dry I added a diagonal line on the other side and waited for it to dry. When is was dry I added one more coat of my jelly polish over the whole nail then I topped it with a quick drying top coat. 


one coat of jelly
two coats of jelly.
AS you can see (hopefully) one side is more jelly then the other. It is kind of subtle but I like it that way since it was my first time trying it out. Next time I will try something a little more bold.

So tell me what you all think of this look and the whole jelly sandwich type look. I will be back in a couple days with a new manicure. Is there something you all would like to see? Let me know in the comments below.

Ttyl,

xoxo Stephanie